
Live streaming workflows
Live streaming means broadcasting video content in real-time as it's being generated. This chapter covers the complete workflow from configuring input signals to delivering live streams to your audience.
Prerequisites
Before beginning, ensure you have:
- ✅ Access to your MK.IO account
- ✅ Connected cloud storage for recording
- ✅ Software or hardware to generate live video signal (e.g., OBS Studio, hardware encoder)
- ✅ RTMP or SRT streaming capability
Understanding live streaming
Live streaming broadcasts video in real-time as content is being generated. This includes:
- Live events - Conferences, concerts, sports
- Live interviews - Real-time conversations
- "Fake live" - Pre-recorded content streamed as if live
- 24/7 channels - Continuous broadcasting
In all cases, content continuously arrives at MK.IO, which prepares it for distribution to your audience.
Preparing your signal source
To stream to MK.IO, you need software or hardware that captures your content and sends it via RTMP or SRT protocols.
Protocol overview:
- RTMP - Established, widely supported (YouTube, Twitch, Vimeo), delivers pre-encoded H.264 video and AAC audio
- SRT - Modern protocol offering superior reliability and security, increasingly used in professional workflows
For this tutorial, we'll use OBS Studio with RTMP for simplicity.
Setting up OBS studio
Installation and basic configuration:
-
Download OBS Studio from obsproject.com (Windows, Linux, or Mac)
-
Launch OBS - you'll see a black preview with controls and source lists
-
Add a simple test source:
- Click "+" under Sources
- Choose "Browser"
- Name it "Clock" and paste this URL:
https://vclock.com - This creates a live clock for testing
Your scene is now ready. Minimize OBS and return to MK.IO to configure the receiving end.
Tip: If the clock site shows a cookie consent banner, right-click the browser source and select "Interact" to accept cookies.
Creating a live event
- Go to your MK.IO project dashboard:
https://app.mk.io/project/<your-project-name> - Navigate to Create → Live Events
- Click + Create Live Event
Configuring your live event
Basic settings:
- Name: "live-tutorial" (descriptive identifier)
- Description: Optional additional information
Event type selection:
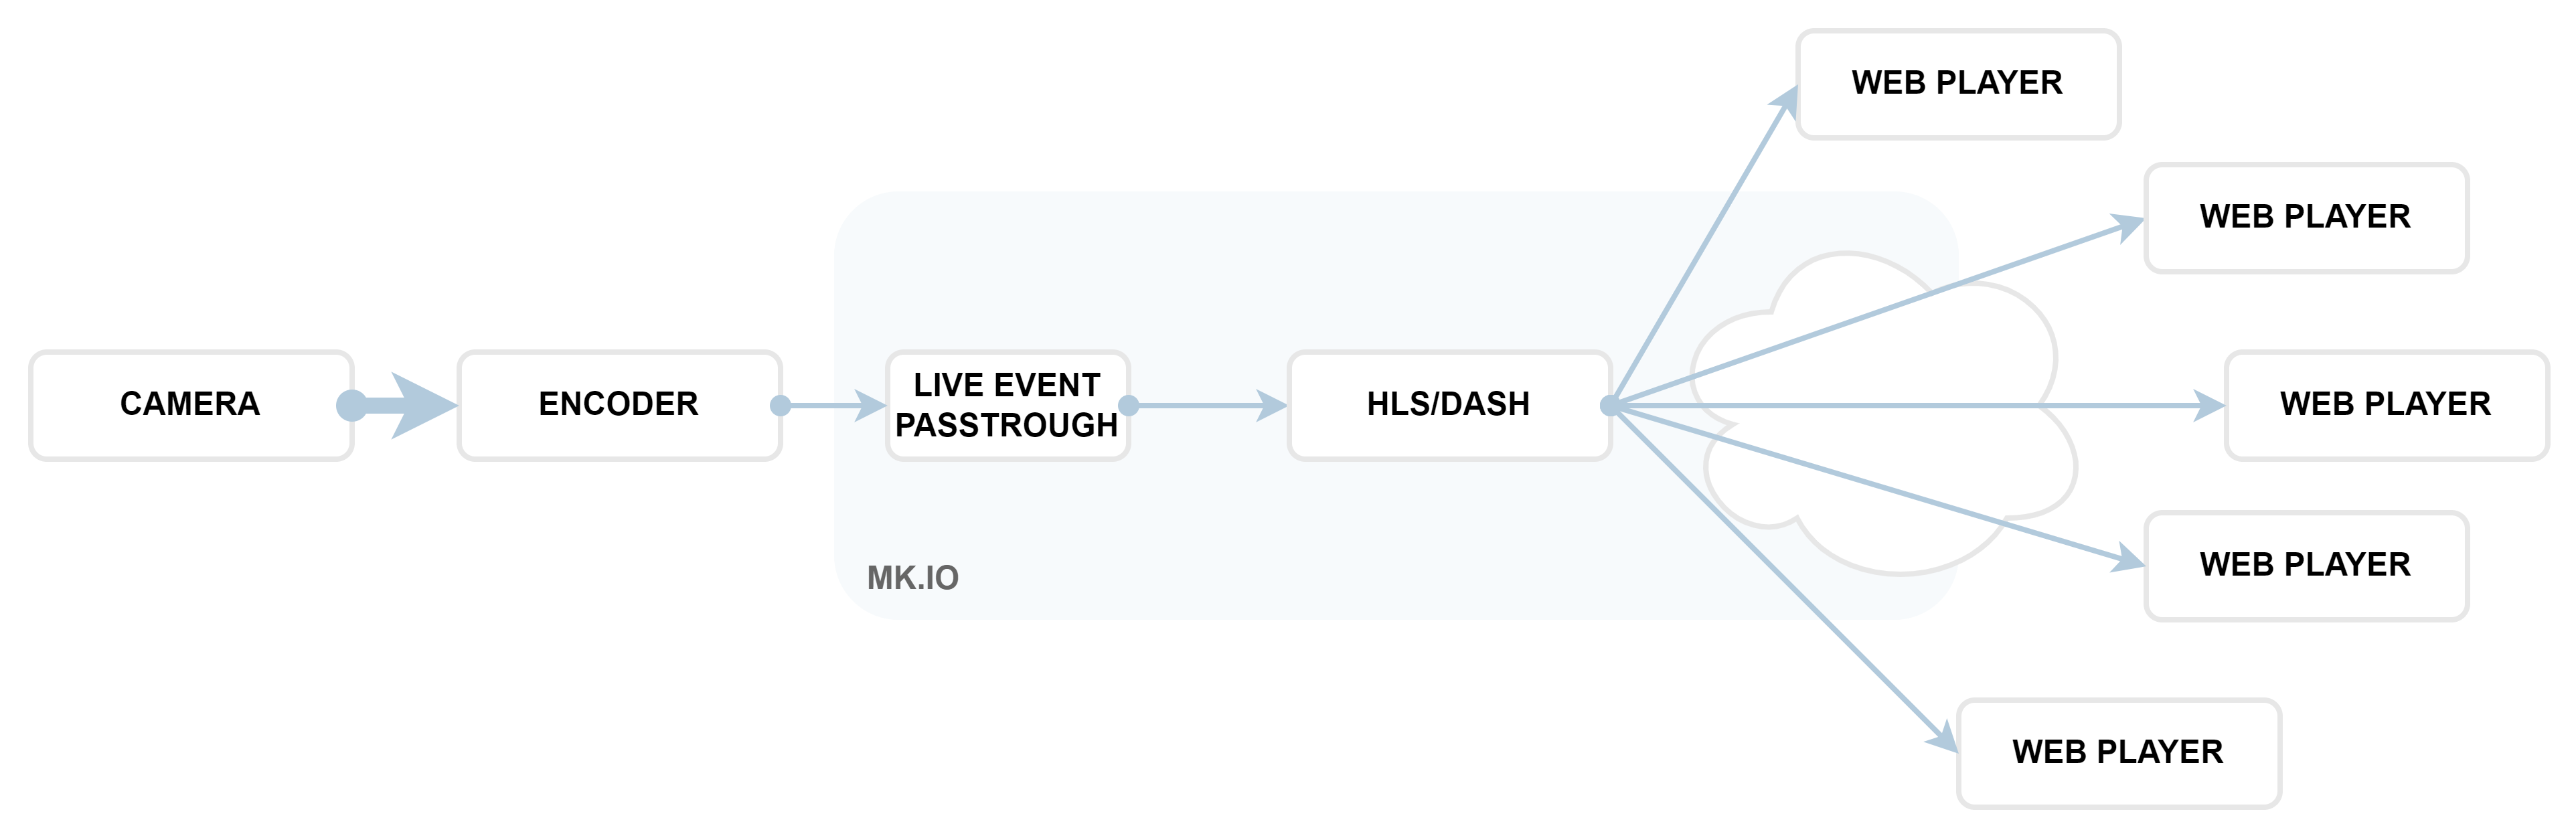
Live passthrough mode:
Not recommended for beginners
- MK.IO receives RTMP input and packages it for streaming without modification
- Stream must be pre-encoded at the source (e.g., by OBS)
- For adaptive bitrate streaming (ABR), encoding must be done at source
- Requires advanced streaming knowledge
Live encoding mode (Recommended):
- MK.IO processes incoming stream and creates multiple resolutions
- Automatically generates adaptive bitrate streaming (ABR)
- Supports both RTMP and SRT input protocols
- Ideal for most use cases
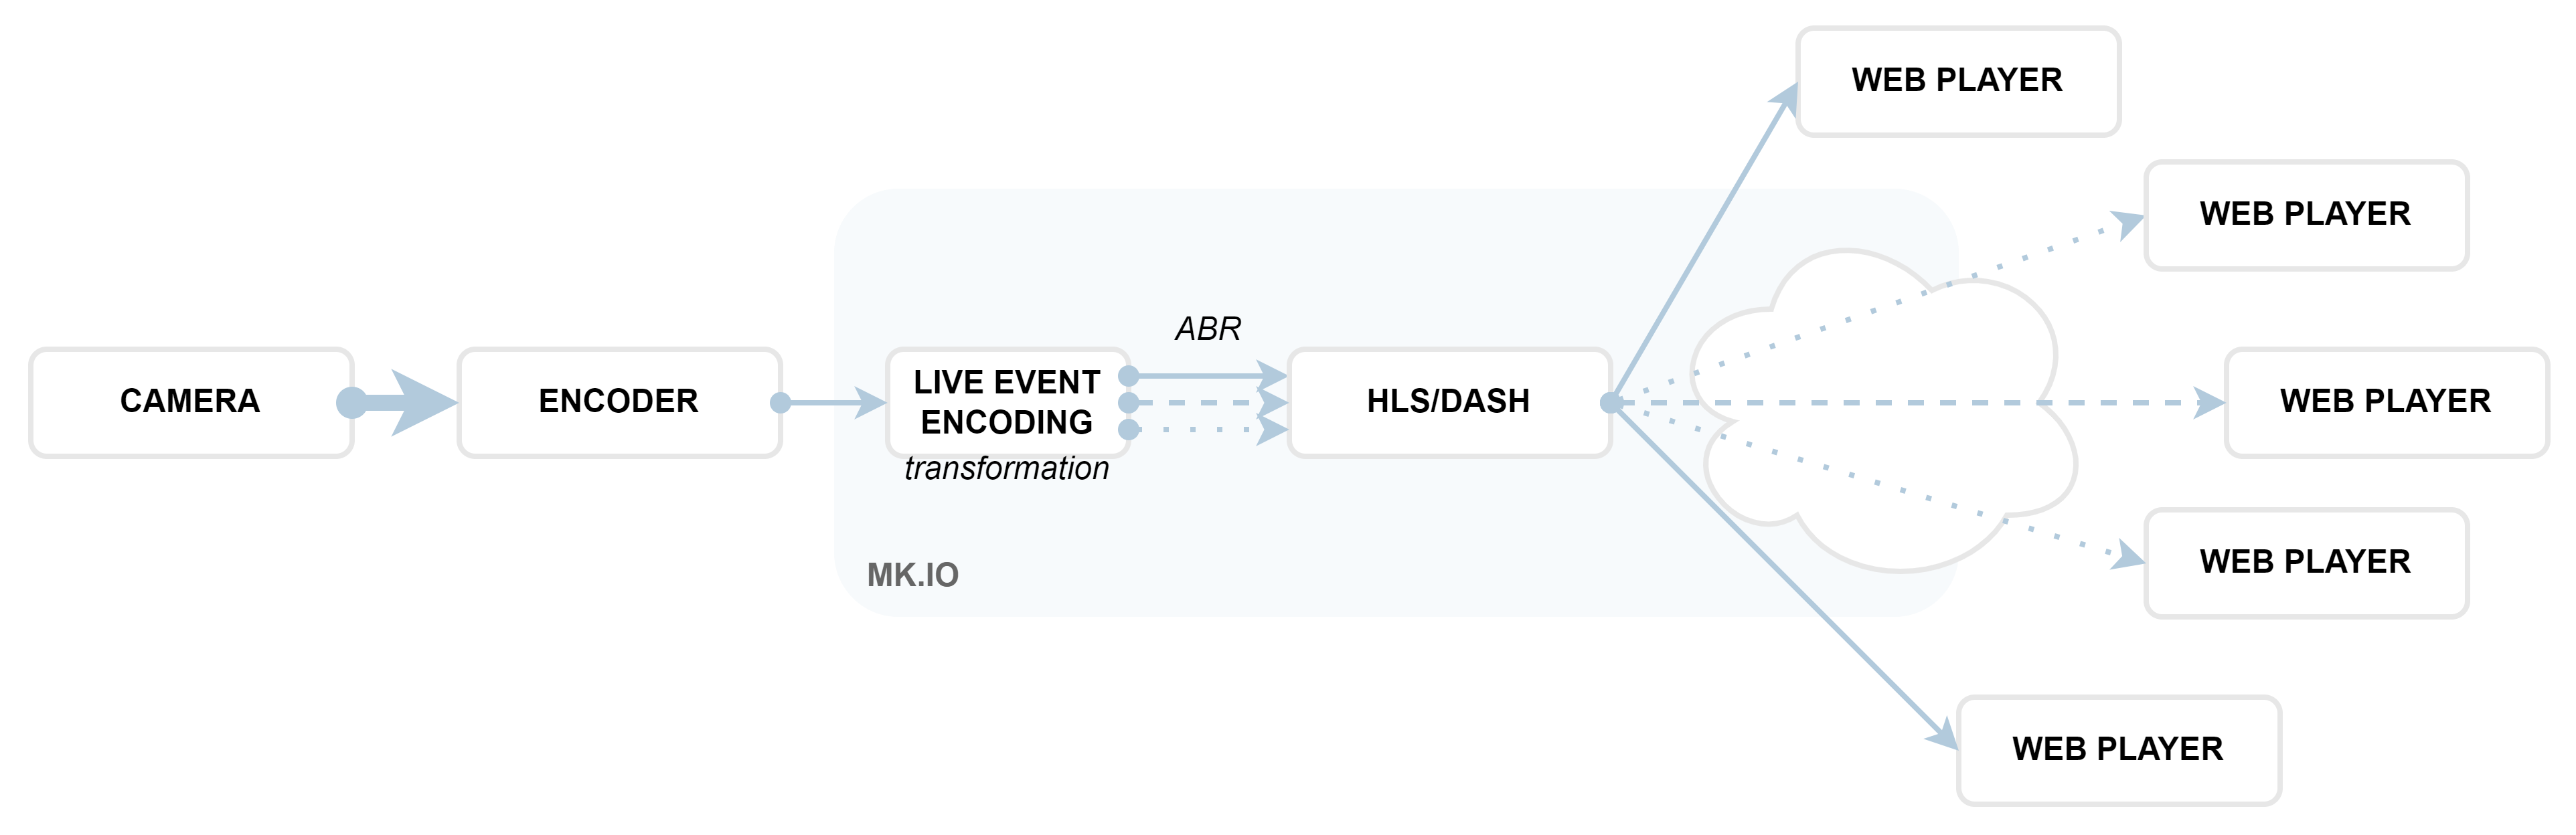
What is Adaptive Bitrate Streaming (ABR)? ABR creates multiple versions of your live stream at different bitrates and resolutions. The player automatically switches between versions in real-time based on network conditions, device performance, and screen size, ensuring smooth playback and optimal viewer experience.
Recommended Configuration:
- Event type: Live Encoding (720p) - good default quality
- Input protocol: RTMP
- Archive window length: How long recordings will be retained
- Storage account: Select your connected storage for recordings
- Output key frame interval: 2 (recommended)
- Image fitting: Auto size
- AI pipeline:
- None - no additional processing
- Predefined_ACSLiveTranscription - for automatic live subtitles (specify ISO language code)
Click Review then Create to finalize your Live Event.
Setting up streaming infrastructure
Just like with VOD, live content requires streaming infrastructure:
Creating a Streaming Endpoint (if not already created)
If you haven't created an endpoint in the VOD section:
- Go to Streaming Endpoints:
https://app.mk.io/project/<your-project-name>/streamingEndpoints - Click + Create Streaming Endpoint
- Configure:
- Name: "TutorialEndpoint"
- Base URL: "tutorial"
- Type: Shared (cost-effective for tutorial)
- Click Create then Start
Endpoint types for live streaming:
- Shared: Up to 200 concurrent viewers, cost-effective
- Dedicated: Up to 10,000 concurrent viewers, better performance
- CDN: Unlimited viewers, maximum performance, lowest latency
Creating a streaming locator
Before starting your live stream, configure the streaming locator:
- In your live event, scroll to the Locators section
- Click + Create Locator
- Configure:
- Name: "live-tutorial-locator" (unique identifier)
- Streaming policy: Predefined_ClearStreamingOnly (streaming without protection)
- Content key policy: (empty) - for DRM protection if needed
- Expiration time: (empty) - stream doesn't expire
- Asset filters: (empty) - for content modification
- Account filters: (empty) - for account-level filtering
- Click Add
Note: Unlike VOD, you cannot apply the streaming locator until the live stream starts. This will be done in the next step.
Going live
In your live event interface, you'll see:
- Input URL for sending your stream (Copy this, you will need it in the next step!)
- Streaming endpoint (should be running)
- Streaming locator (configured but not yet applied)
Configure OBS for streaming:
- In OBS, go to Settings → Stream
- Configure connection:
- Service: Custom
- Server: Input URL without "/stream" suffix (The URL you copied from MK.IO)
Example: rtmp://in-707ee7ae-a496-42b9-a450-0a6895af6a68.uksouth.streaming.mediakind.com:1935/527ecc1d-2e14-49ef-86f0-778cba76b3c0 - Stream Key:
stream
- Click Apply and OK
To start streaming:
- Start the Live Event in MK.IO.
- In OBS, click Start Streaming (this sends your feed to MK.IO)
- Once MK.IO is receiving the stream, Apply the Streaming Locator
- MK.IO will generate your Playback URLs in HLS and DASH formats
Your stream is now live and ready for viewers to watch through MK Player or any compatible player.
Monitoring your stream
OBS status indicators (bottom of OBS window):
- Bitrate: Data sent per second - should be stable and green
- Dropped frames: Should stay at 0% - indicates network or CPU issues
- FPS: Frame rate being sent (typically 30 or 60)
- CPU usage: Keep below 60%, absolutely avoid 90%+ (causes quality issues)

In MK.IO:
- Return to your Live Event page
- You'll see the stream in the built-in player
- Verify that your Playback URLs are visible for HLS and DASH formats
- Test the URLs in MK Player or another compatible player to confirm viewers can access the stream
Latency Note: You'll notice a delay between OBS input and MK.IO player output. This is normal - typical delays are 15-30 seconds, which MK.IO optimizes compared to standard solutions (50-60 seconds). With low-latency players, delays can be as low as ~20 seconds.
Sharing your live stream
Once your streaming locator is applied, you'll have access to:
Playback URLs:
- HLS:
https://tutorial.uksouth.streaming.mediakind.com/.../manifest(format=m3u8-cmaf) - DASH:
https://tutorial.uksouth.streaming.mediakind.com/.../manifest(format=mpd-time-cmaf)
URL structure:
https://tutorial.uksouth.streaming.mediakind.com/<locator-id>/<live-event-name>.ism/manifest(format=mpd-time-cmaf)These URLs can be used with:
- MKPlayer - MediaKind's advanced web player (included with MK.IO)
- Third-party players like:
- Dash.js - Official DASH player
- Akamai Player - Supports HLS and DASH with low latency
- HLS.js Demo - HLS web player with detailed settings
Cost alert: When viewers access live streaming URLs, egress transfer costs apply. See MK.IO pricing for details.
Recording and playback
Automatic recording: Your live stream is automatically recorded to your connected storage. Once you stop the event:
- Go to Outputs in your Live Event
- You'll see an asset containing the complete recording
- Click the asset link to access the VOD version
This recording becomes a standard VOD Asset that you can process with transformations, create additional Streaming Locators, or use for distribution.
Stopping your stream
When your event concludes:
- Click Stop on the Live Event page in MK.IO
- In OBS, click Stop Streaming
- If the streaming endpoint is no longer needed, stop it to prevent unnecessary costs
Advanced live streaming features
Automatic transcription:
- When creating a live event, select Live Encoding type
- Set AI Pipeline to Predefined_ACSLiveTranscription
- Specify ISO language codes for translation capabilities
SRT input:
- Choose SRT in Input Settings when creating a Live Event
- Requires Live Encoding event type
- Offers superior reliability for professional workflows
AI-Powered features:
- Real-time transcription and translation
- Upcoming features include dubbing and advanced video analysis
- Language codes enable multilingual content delivery
Live streaming best practices
Technical considerations:
Test your setup before important events
Monitor CPU usage and network stability
Have backup streaming locations ready
Use wired internet connections when possible
Cost optimization:
Stop streaming endpoints when not in use to save costs.
Track data usage during live events to prevent overages.
Select endpoint types based on expected viewership.
Optimize recording storage to control ongoing costs.
Content strategy:
Ensure smooth playback across devices and networks.
Use captions or transcription for multilingual audiences.
Have backup videos ready for technical issues.
Verify URLs work reliably with your target players.
Your live streaming workflow is now complete! You can broadcast real-time content to global audiences while automatically creating recordings for later use.
Updated 3 months ago