Live streaming
Getting Started with MK.IO
Creating a live stream with MK.IO
Hi! in this tutorial I’d like to walk you through how to create a live stream with MK.IO.
This is not just a guide to creating a live stream with MK.IO, it's also a chance to learn a few behind-the-scenes secrets of how this technology works.
This tutorial is designed for users with little experience creating live events, or for those who haven’t worked with MK.IO yet.
I hope you enjoy the ride. Shall we begin?
Prerequisites
Before you begin, make sure you:
- Have access to your MK.IO account → Sign-up instructions
- Have connected your storage → Configure cloud storage in MK.IO
- Have a way to send your signal via RTMP or SRT (e.g., OBS or MK.IO Beam)
Step 1: What do we mean by "live"?
Creating a live stream means broadcasting a video signal in real time as it’s being generated, it could be a live event, a live interview, or even a pre-recorded video that’s streamed as if it were live ( commonly known as "fake live") and more. In all these cases, content is continuously arriving at the MK.IO platform, which then prepares it for distribution and makes it ready for your audience to watch online..
Step2: Preparing the signal for MK.IO
To begin, you need a live signal ready of your event to be sent to MK.IO. This can come from a camera, a mixer, or a software encoder.
Let’s start by setting up the signal from your event so MK.IO can receive and broadcast it.
This is a big topic in the industry, with many technical options and professionals dedicated to designing the best solution for each use case. In this tutorial, we’ll stick to a simple, quick setup to help you start experimenting. If you’re planning a high-profile production, don’t hesitate to involve a specialist.
To send a signal to MK.IO, you’ll need software or hardware that captures your event feed from one or more cameras, or a pre-recorded source and sends it using RTMP or SRT.
- RTMP is the most established protocol for live streaming. It’s widely supported (e.g., YouTube, Twitch, Vimeo), and delivers a pre-encoded signal (typically H.264 video and AAC audio). It’s reliable, even if the technology is a bit older.
- SRT is a more modern and flexible protocol for transporting high-quality signals over IP, offering strong reliability and security. It’s widely used in professional workflows and is gradually gaining adoption in the consumer market.
MK.IO supports both. For this tutorial, we’ll use RTMP with OBS Studio encoder software to keep things simple.
Set up OBS
- Install OBS. It's available for Windows, Linux or Mac systems here: https://obsproject.com/download
- Launch it — it will look like a black screen with controls and source lists.
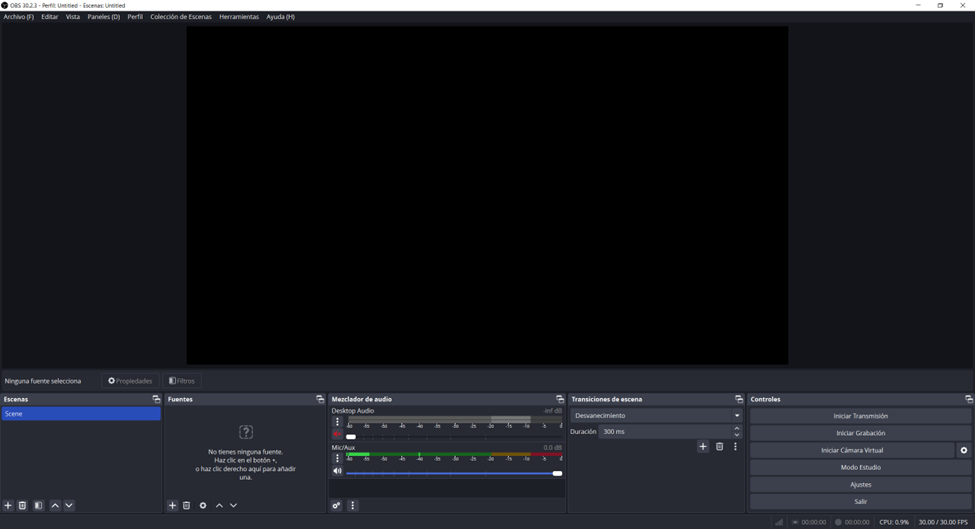
Default view of OBS
- Add a source. Let’s create a simple live signal by using a clock from the web. Simple but practical
- Click "+" under Sources
- Choose "Browser"
- Name it (e.g., "Clock"), and paste this URL: https://vclock.com
This will show a live clock in your OBS scene.
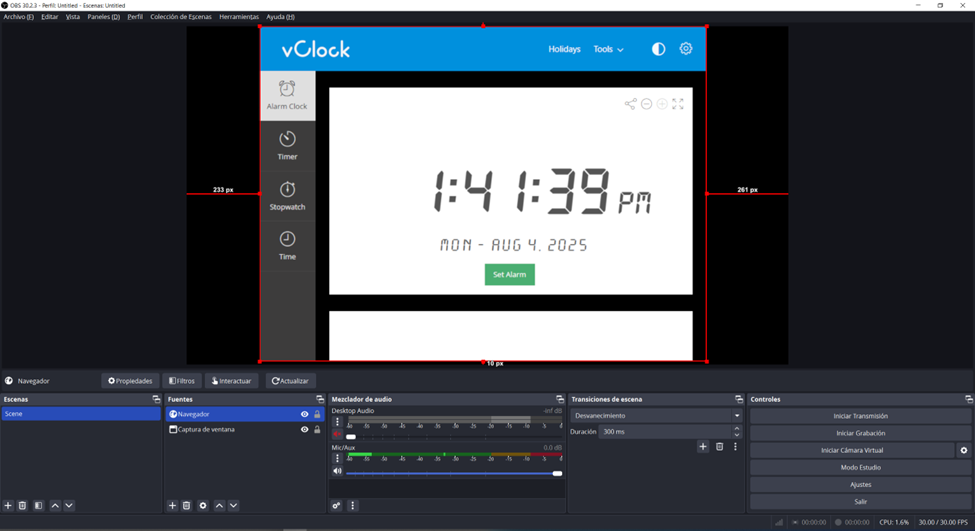
Our scene ready
And now your scene is ready to go live. Minimize OBS for now — we’ll come back to it later — and head over to MK.IO.
Tip: If the site shows a cookie consent, right-click the browser source and "Interact" to accept cookies.
Step 3: Creating the live event
Go to your MK.IO project dashboard:
https://app.mk.io/project/{your-project-name}
Replace<your-project-name> with the actual name of your project — for example, sales-engineering.
Now we create the Live Event. Navigate in the left bar to Create > Live Events
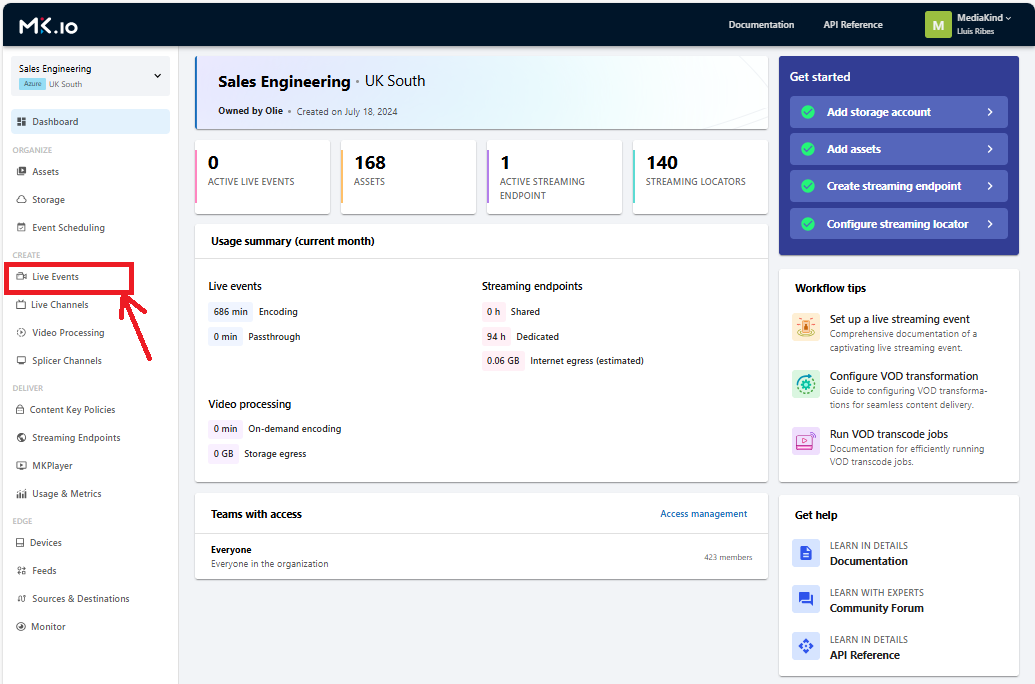
MK.IO Project Dashboard
-
Click + Create Live Event
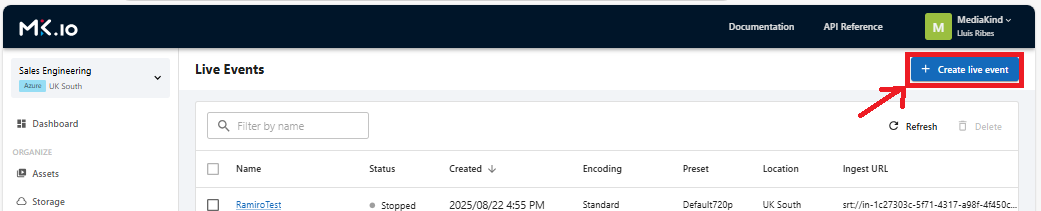
Create a live event
-
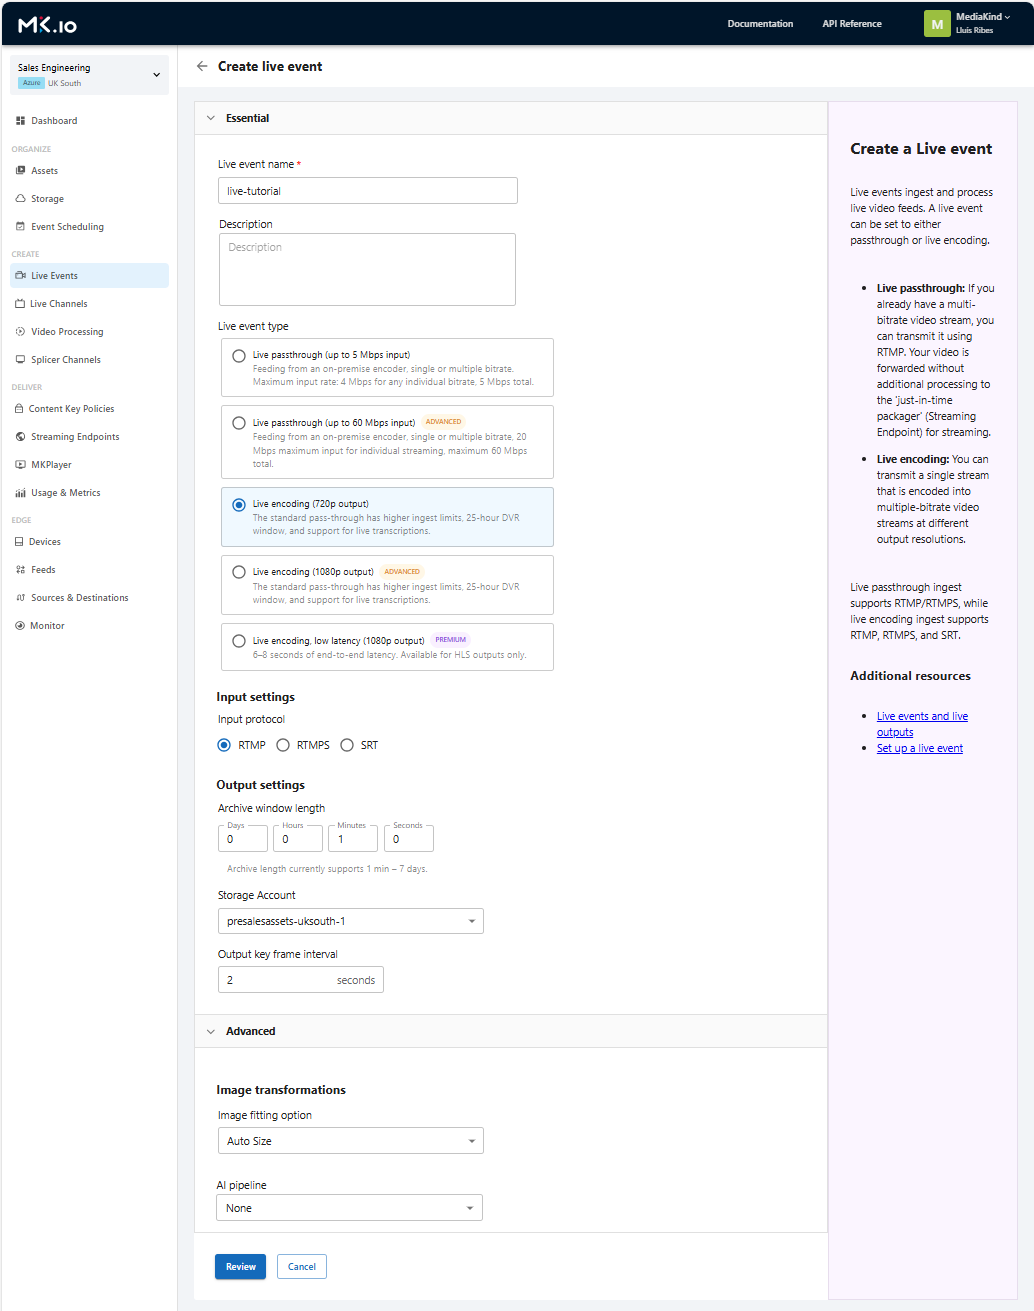
Fill in:
- Name: live-tutorial
- Description: (optional)
Choose event type
-
Passthrough don’t modify the incoming signal. MK.IO receives the RTMP input and simply packages it for streaming. This means the stream must already be properly encoded — usually by the software generating the signal, such as OBS. And if you want adaptive bitrate streaming (ABR), it has to be produced at the source, which adds extra complexity to your encoder or source setup.
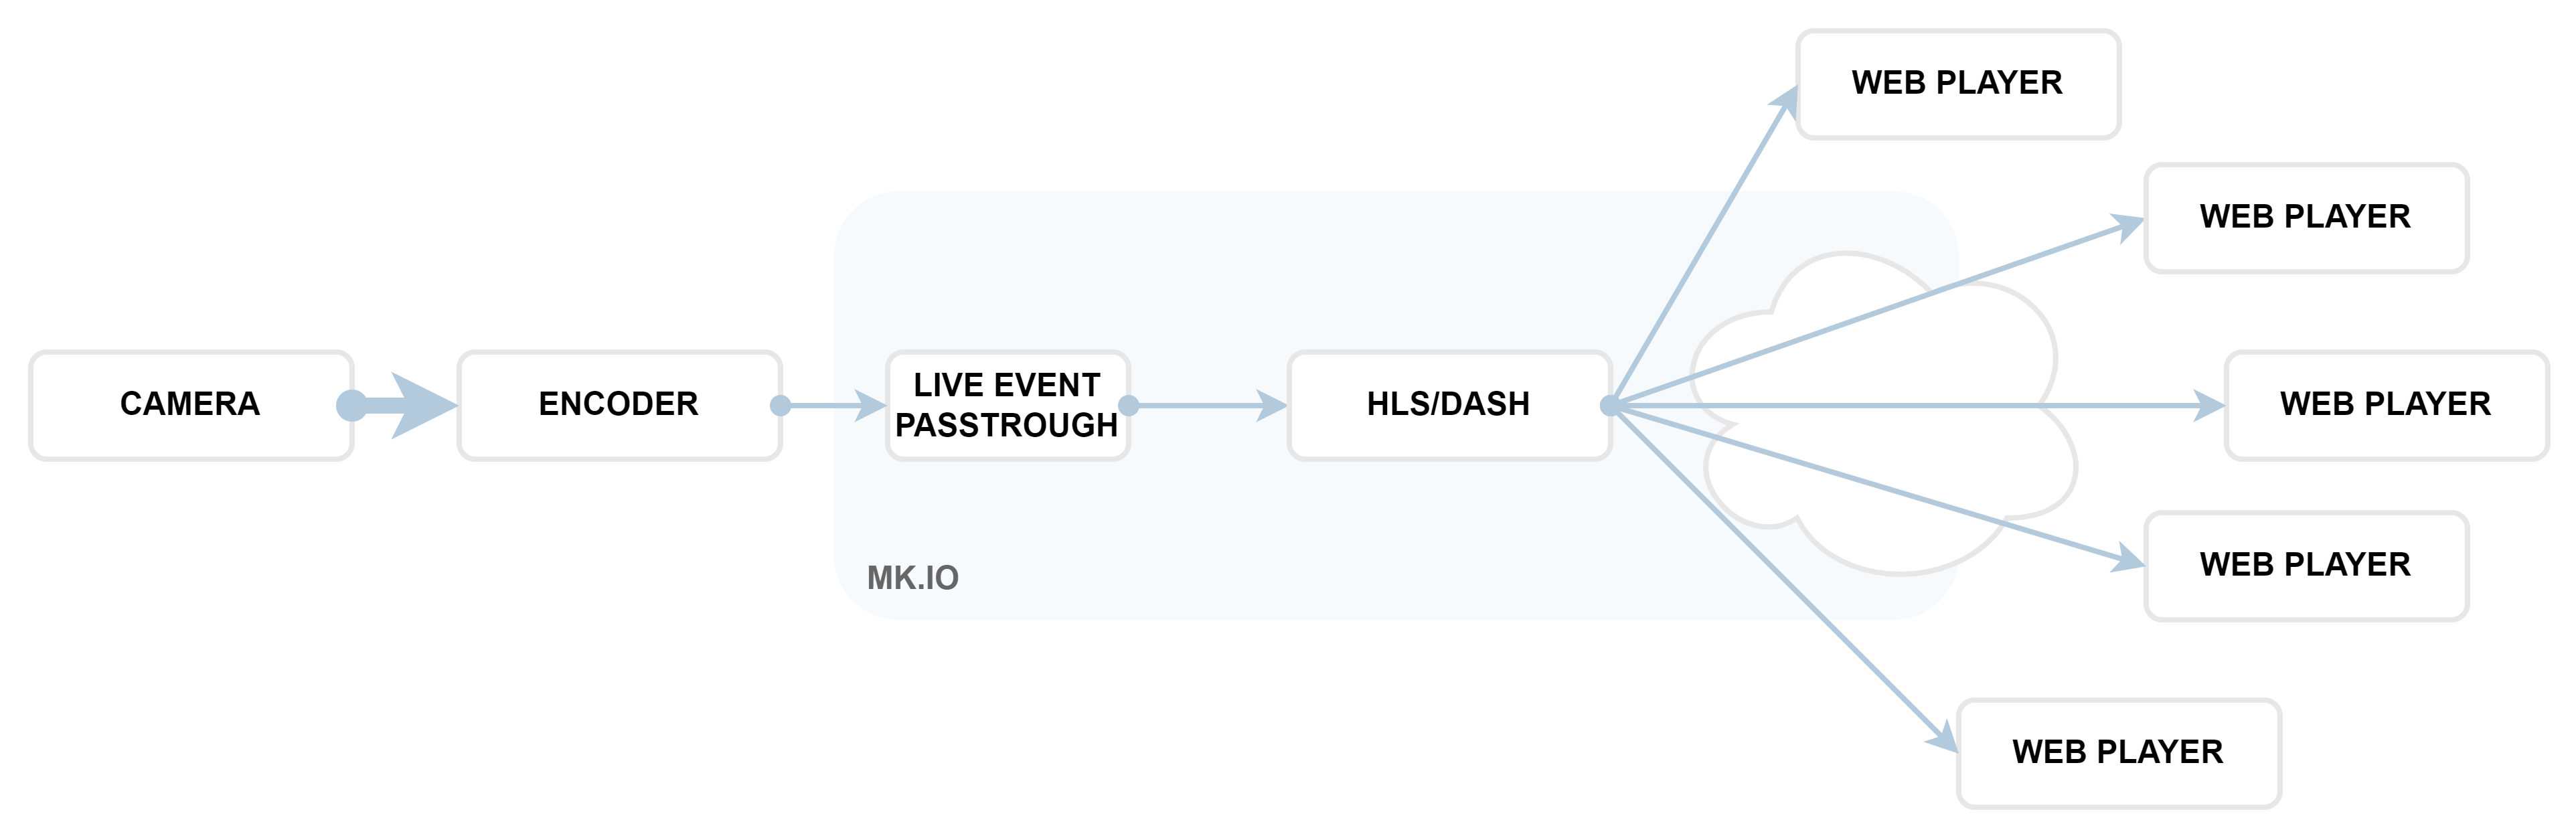
Passthrough is intended for advanced use cases where the user has full control over encoding parameters. It requires solid knowledge of streaming and compression to ensure a good experience. We won’t use this mode in this tutorial.
-
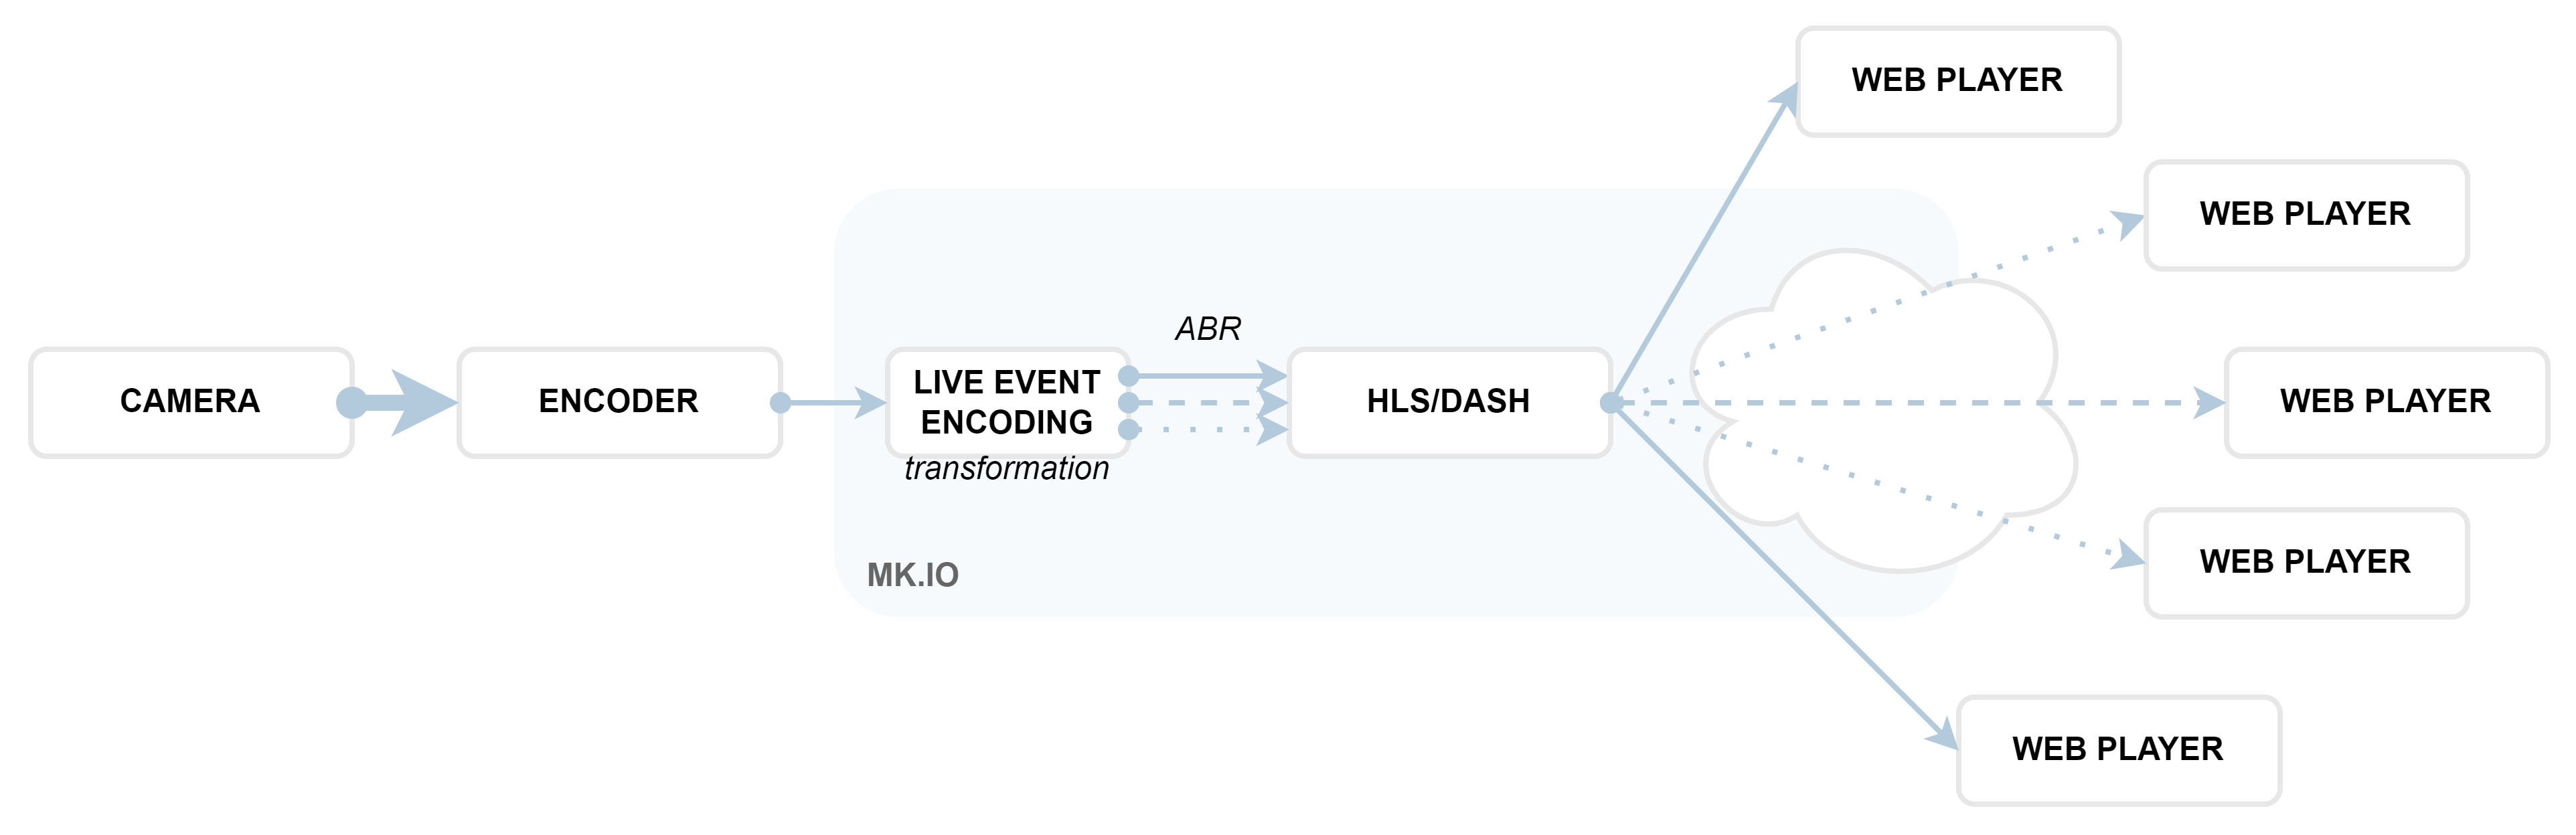
Live Encoding, on the other hand, process the incoming stream in MK.IO and transforms it into multiple resolutions using optimized encoding creating adaptive bitrate streaming (ABR) from the source. It’s also the only mode that supports SRT input. It is the option we use in this tutorial and which I’d generally recommend.
💡 Did you know what is Adaptive Bitrate Streaming? (ABR) Adaptive Bitrate Streaming (ABR) is a technique used in online video delivery where multiple versions of the same content are created at different bitrates and resolutions. The player on the viewer’s device automatically switches between these versions in real time, depending on network conditions, device performance, or screen size. This ensures smoother playback, reduces buffering, and provides the best possible viewing experience for each user.
We’ll choose Live Encoding (720p) It's a good default.
Input settings
- Protocol: RTMP
Output settings
- Archive Window Length: how long the recording will be available
- Storage Account: where the video will be stored
- Output Key Frame Interval: 2
Advanced
- Image Fitting: Auto Size
- AI Pipeline: None or
Predefined_ACSLiveTranscriptionfor live subtitles (with ISO language code)
Click Review and then Create.
Live event page creation
Step 4: Streaming Endpoints – What and why?
The Streaming Endpoint is the component in your MK.IO account that makes your live event available to your audience on the internet. You can find a detailed explanation here: https://docs.mk.io/docs/endpoints#/
You can create one or several, and there are different types. They can be turned on or off. A single Streaming Endpoint can have hundreds of live events (and video On-Demand assets) assigned to it, but a live event can only be assigned to one Streaming Endpoint at a time (although you can change this whenever you want).
At the time of creating this tutorial, there are three types available:
- Shared: Cost-effective, ideal for lighter workloads, supports up to 200 concurrent users.
- Dedicated: Good performance, scalable to serve up to 10,000 concurrent users without issues.
- CDN : Maximum performance, no limit on concurrent users, and low latency.
For the tutorial, I’ll create a Shared endpoint. Regardless of which type you choose, the way you use it is the same, so you can follow along without any problem.
-
Go to:
https://app.mk.io/project/<your-project-name>/streamingEndpoints -
Click + Create Streaming Endpoint
-
Choose:
- Name: endpointTutorial
- Base URL: tutorial
- Type: Shared Click Create and then Start the endpoint.
After configuring the streaming Endpoint, you need to configure the streaming Locator for the Live Event.
Heads-up: A running endpoint may generate costs even when idle. See mk.io/pricing for details
Step 5: Streaming Locator– What and why?
The Streaming Locator is the last piece we need before our Live Event is ready to go live. Think of it as the “ticket” that gives your audience permission to access your content. A Streaming Locator lets you set specific rules for how your live will be published. For example, you can:
- Choose dates when the live will be available, and when it will stop being accessible.
- Protect it with DRM so that only authorized viewers can watch it.
There’s a lot more you can do — the full list is in the documentation: https://docs.mk.io/docs/locators#/
For now, the key things to remember are:
- Every Live Event must have at least one Streaming Locator to be published.
- You can assign more than one Streaming Locator to the Live Event, each one generating a unique URL for streaming.
- If no recording output exists in the Live Events, you’ll be asked to create one (choose the asset name and storage) before adding the Streaming Locator.
In the next steps, we’ll create a Streaming Locator so our Live Event can be shared with the world.
-
Scroll to the Locators section into the asset window and click + Create Locator
-
Configure:
- Name: locator-tutorial . The locator name must be unique in all your project
- Streaming policy: Predefined_ClearStreamingOnly . This policy permits not stream the asset
- Content Key Policy: (empty) . This is used to protect the content
- Expiration time: (empty) . In my tutorial I would not assign expiration date for publication
- Asset filters: (empty) . You can learn more here: https://docs.mk.io/docs/assets#/
- Account filters: (empty) .You can learn more here: https://docs.mk.io/docs/create-an-asset-filter#/
Click Add. You’ll notice that you can’t apply the Streaming Locator yet. In a Live Event, you first need to start the stream, as we’ll explain in the next section, Go Live.
Step 6: Go live
It’s time to go live. We have in our Live Event screen:
- An input URL
- A streaming endpoint assigned and running
- A streaming locator configured
Then copy the Input URL in your clipboard, Start the event and apply the Streaming locator
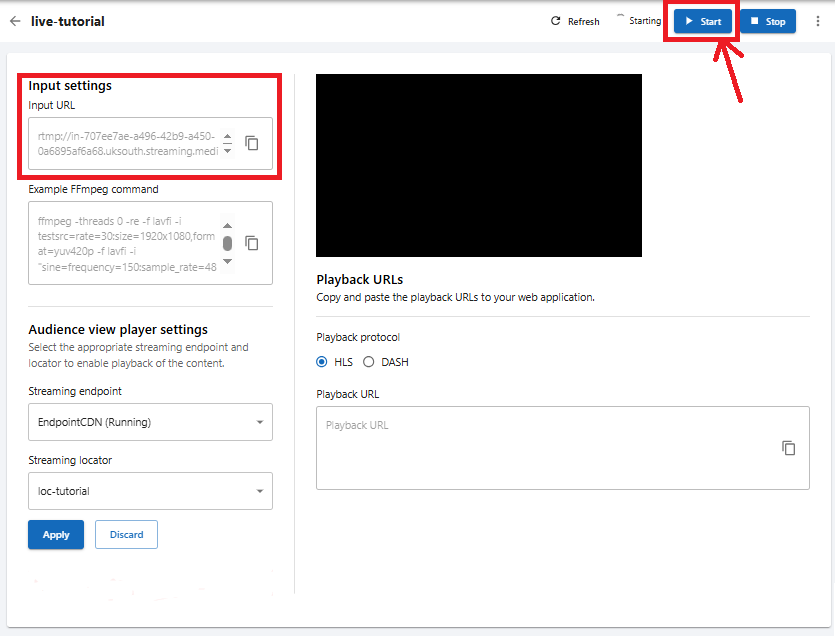
Main options in the Live Event page
Once the Live event is running
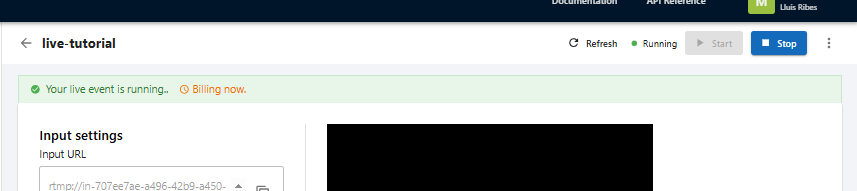
Status bar shows Live Event is actived
Go to OBS and follow these steps:
-
Go to Settings > Stream
-
Set:
- Service: Custom
- Server: copy the Input URL from the clipboard without the
/streame.g.: rtmp://in-707ee7ae-a496-42b9-a450-0a6895af6a68.uksouth.streaming.mediakind.com:1935/527ecc1d-2e14-49ef-86f0-778cba76b3c0 - Stream Key:
stream
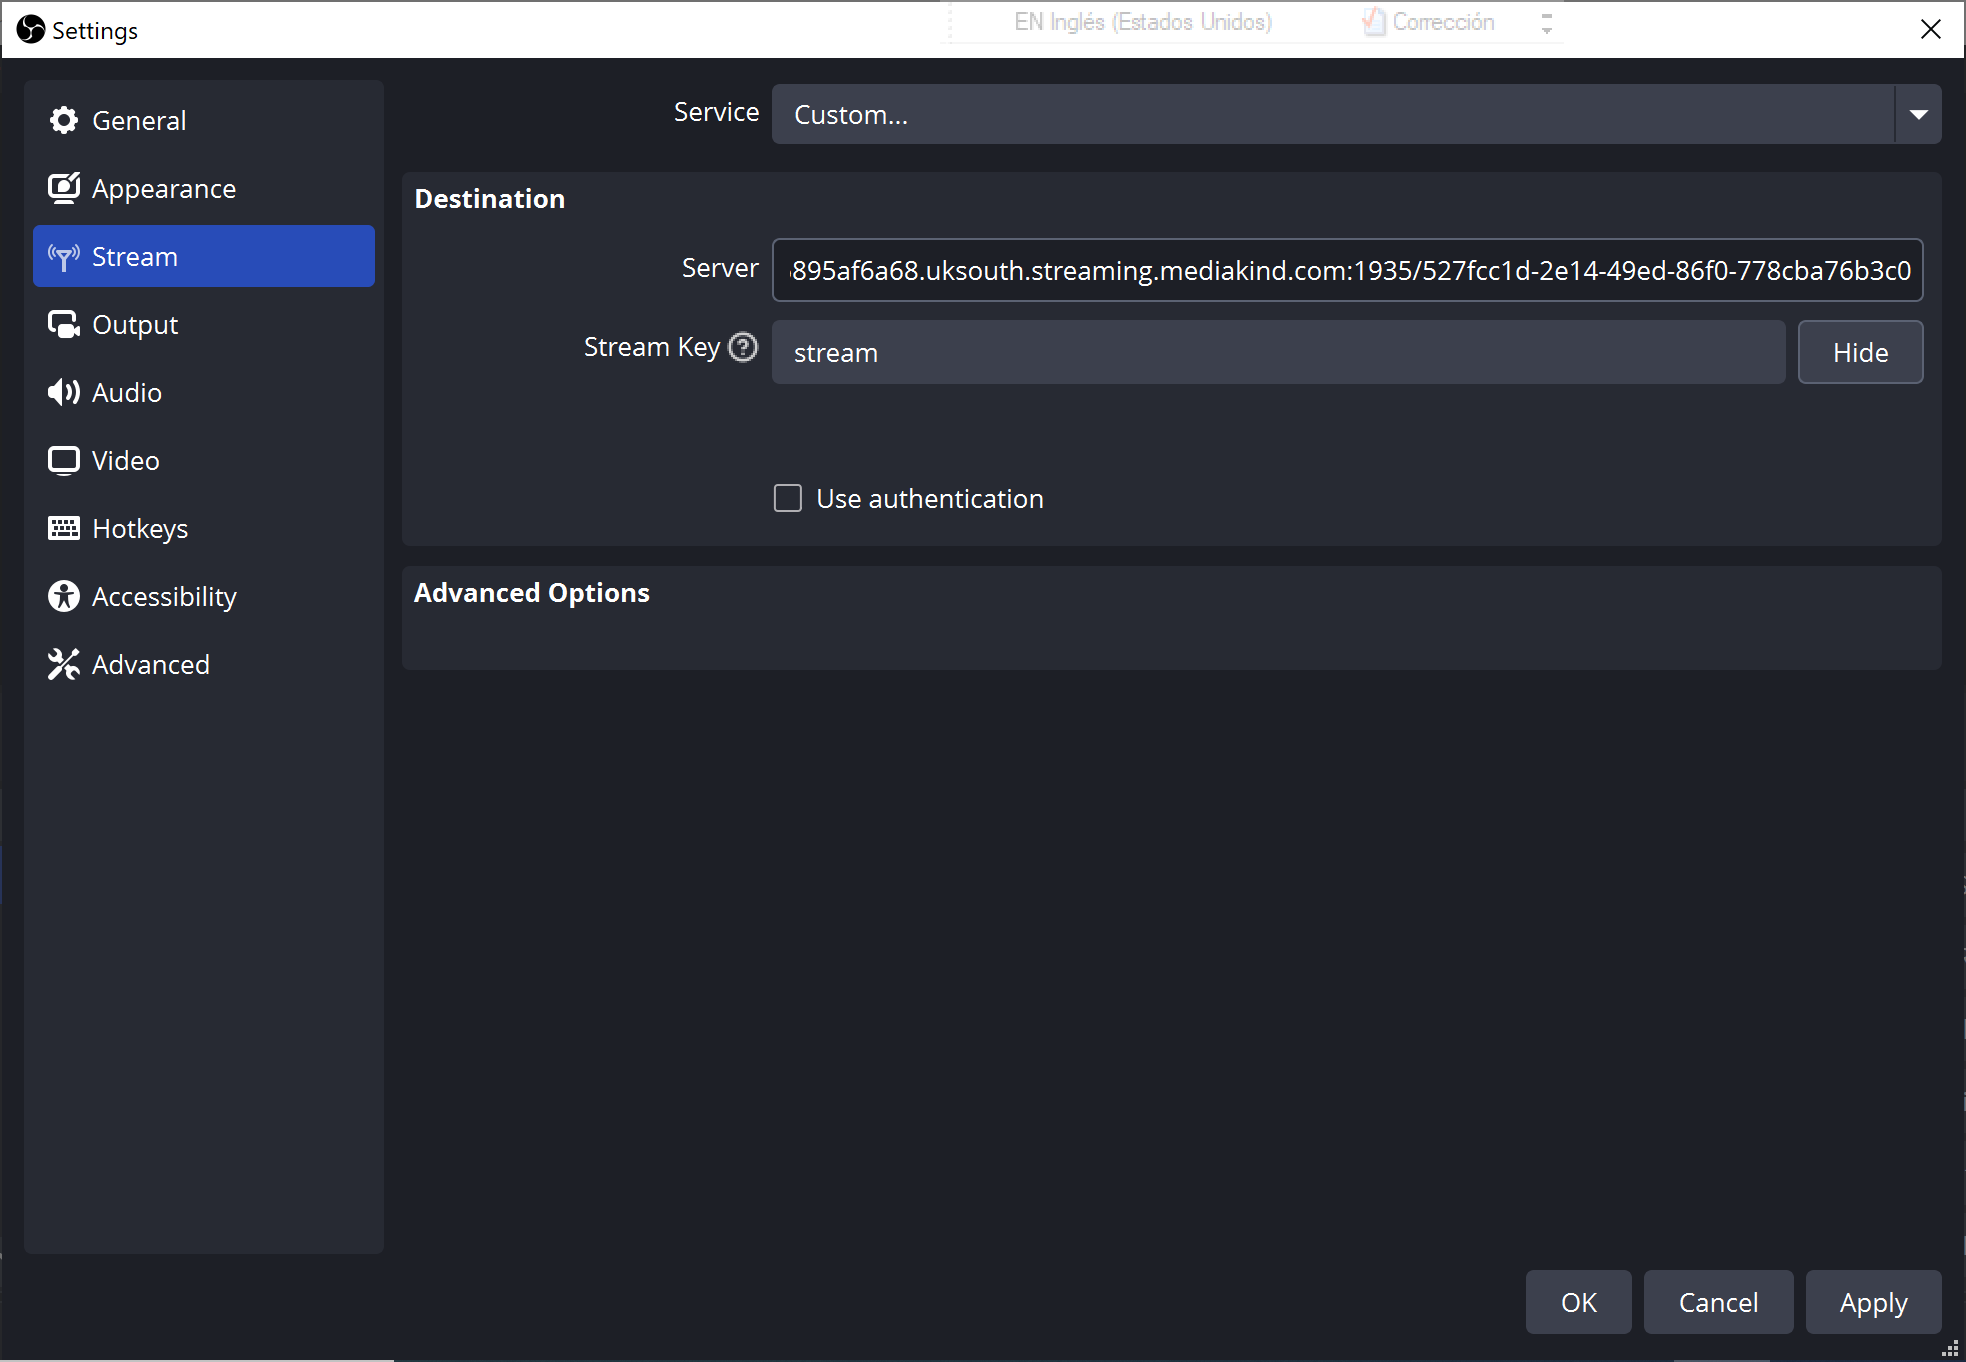
Settings options OBS
-
Click Apply and Ok
-
And in the main window, click Start Streaming
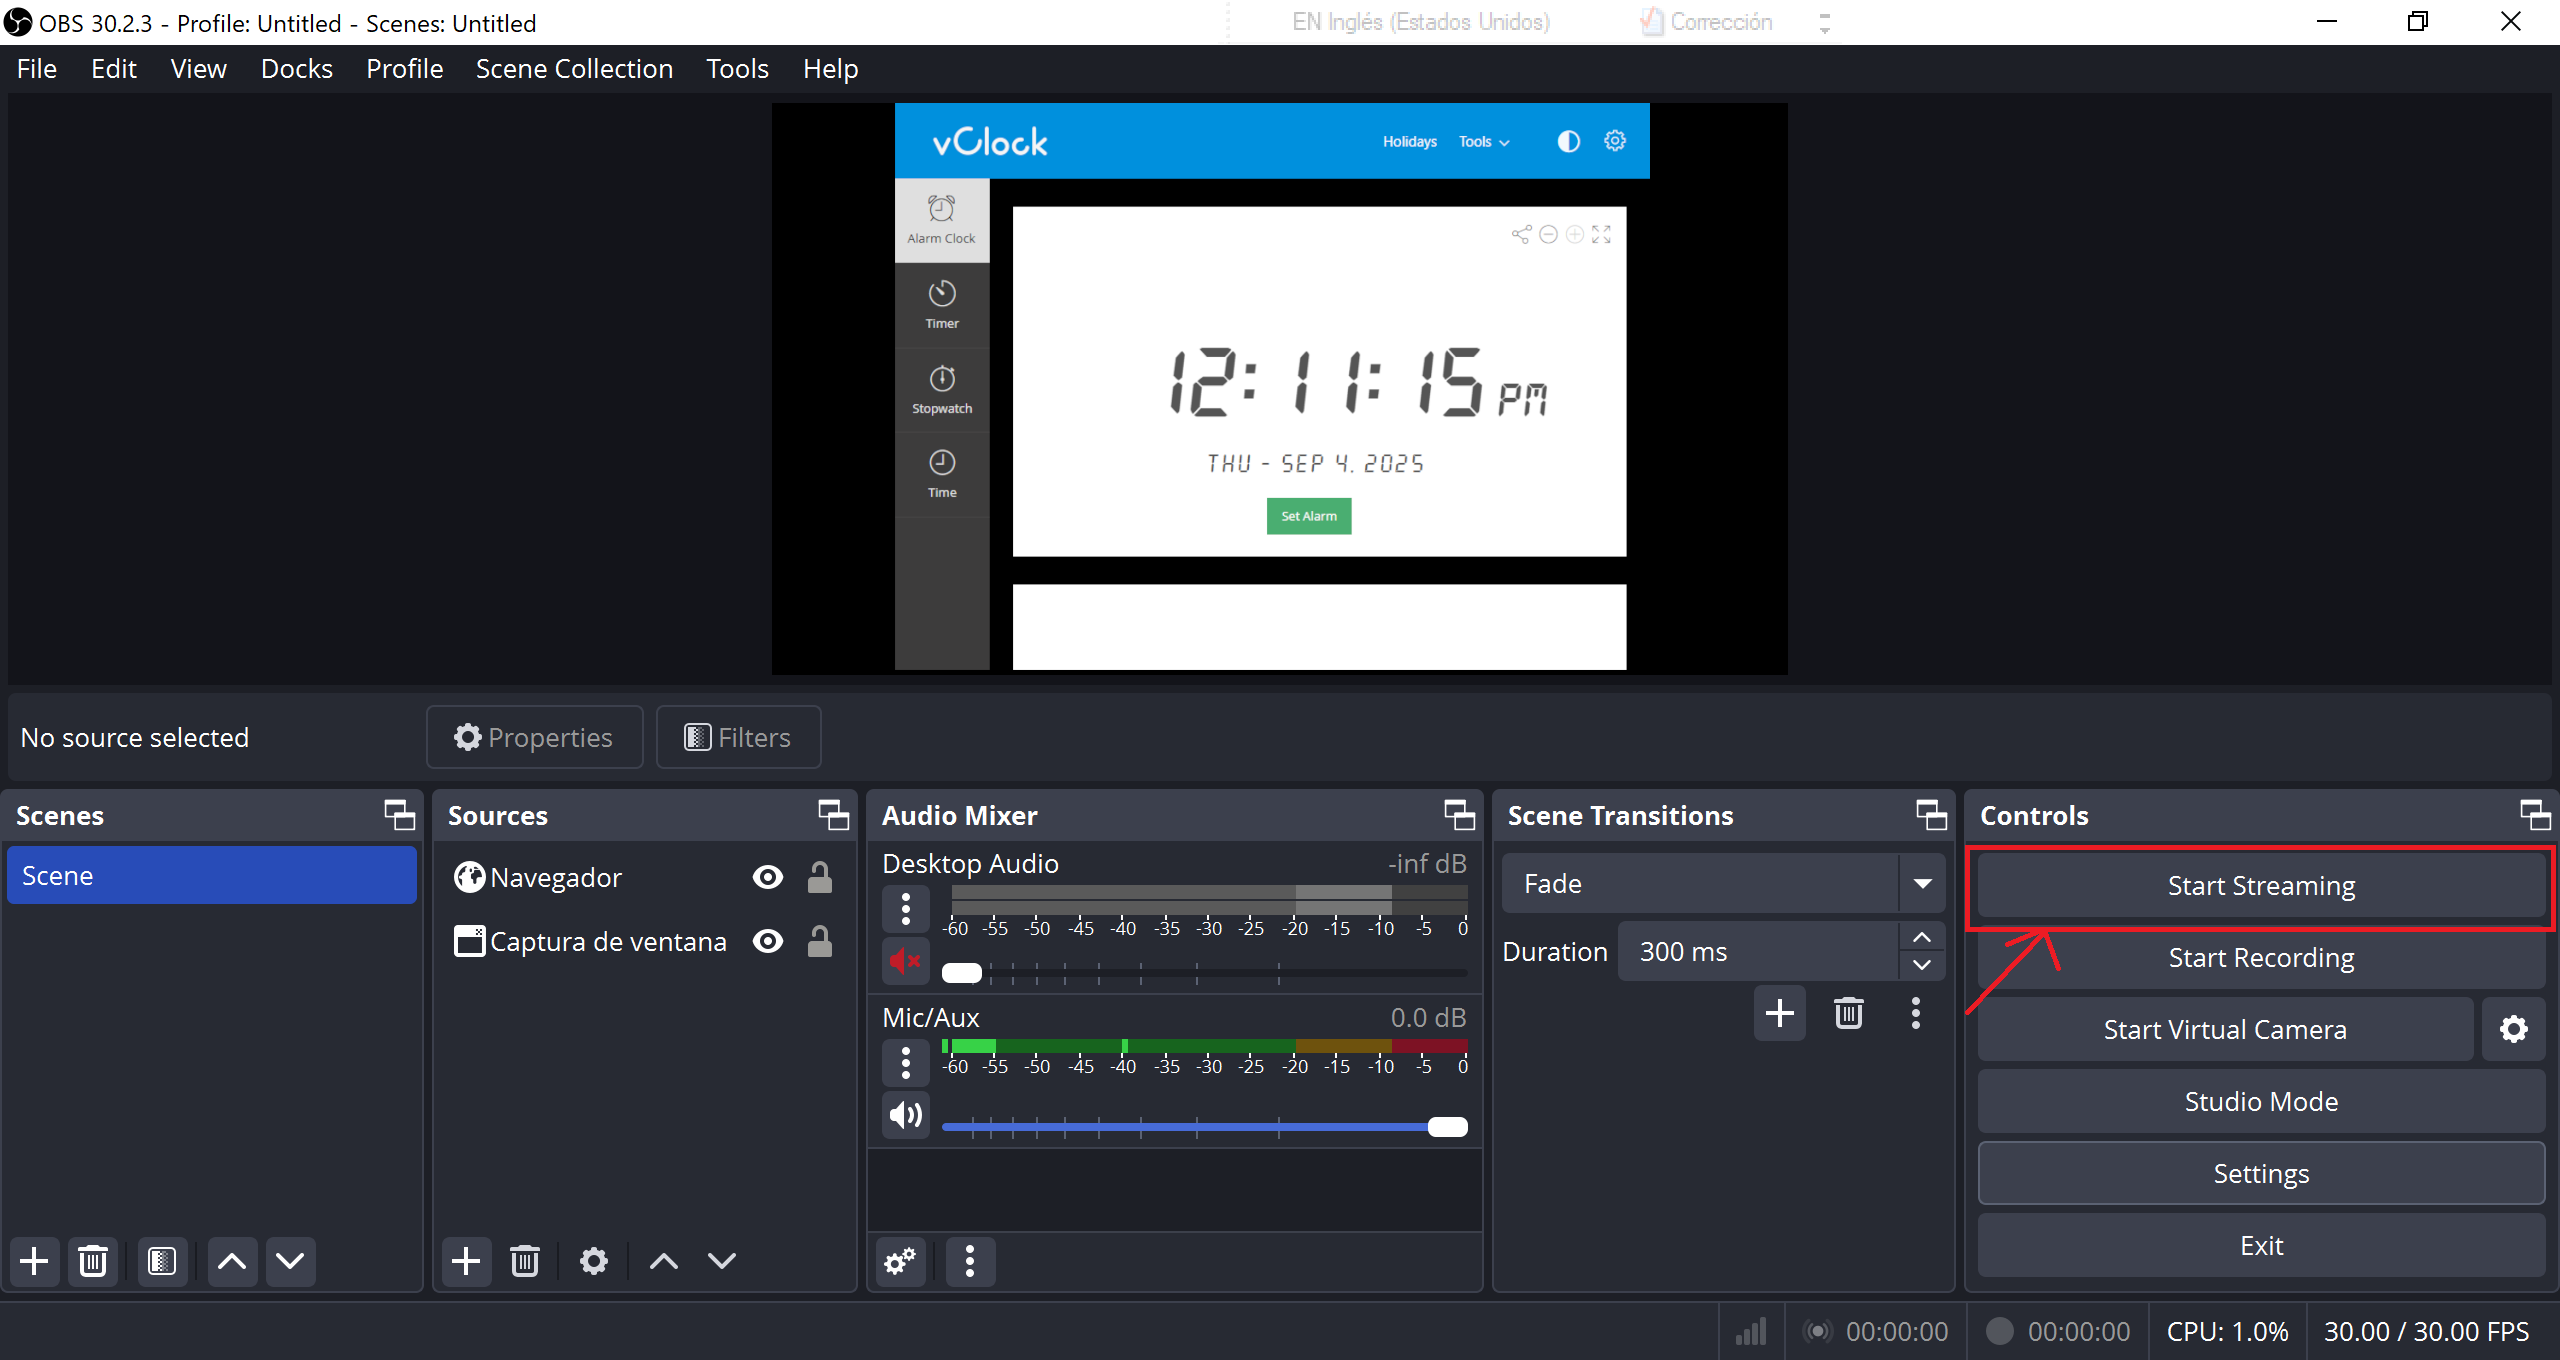
OBS ready to start streaming
Watch in the bottom of OBS window status for:

OBS Live status
- Bitrate: Shows how much data is being sent to the streaming server every second.
- If it’s stable and green, your stream is healthy
- If it fluctuates heavily or turns red, network may not handle the selected quality
- Dropped frames: Percentage of frames lost during transmission due to network issues.
- Should stay to 0% as possible
- Consistent drops mean your internet upload speed or your CPU isn’t keeping up
- FPS: The frame rate being sent (commonly 30 or 60).
- If this number dips below your setting, your system may be struggling
- CPU usage: How much of your computer’s CPU is used. It’s important to keep this below 60%, and absolutely avoid reaching 90% or higher. Excessive CPU usage leads to lag, dropped frames, and quality issues that neither MK.IO nor the viewer’s web player can fix.
Share your stream
Now is time to come back MK.IO, to the Live Event page and you will watch the streaming in the Built-in player embedded.
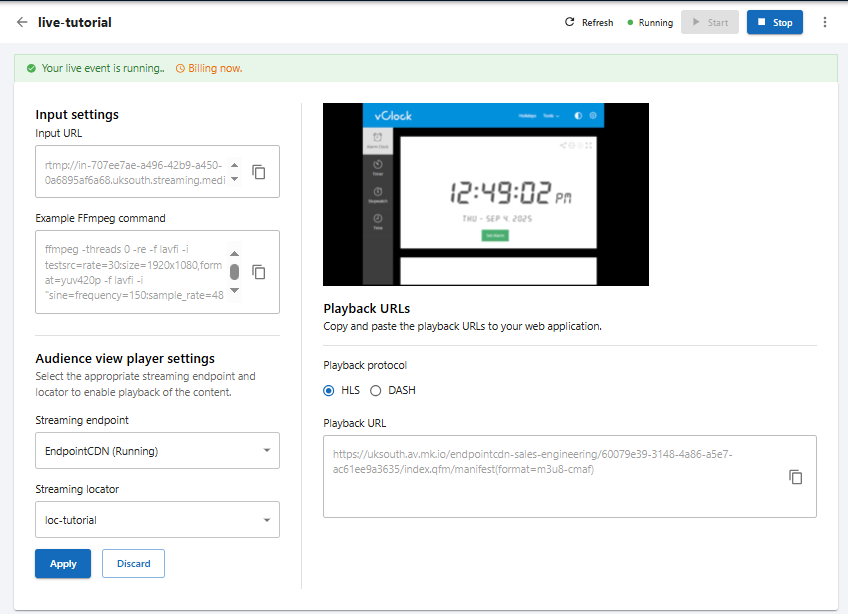
Live Event running with signal
Tip: You’ll notice a delay in the MK.IO built-in player in the Live Event page compared to OBS input. This is normal in live streaming workflows. The good news is that MK.IO, by default, improves latency by 15 to 30 seconds compared to typical streaming solutions (50 to 60 seconds). With a web player that has Low Latency enabled, you can expect delays as low as ~20 seconds. And if you need to push latency even further down, get in touch with us, we have solutions for that.
Now it’s time to Apply the Streaming Locator you created, this is what enables the stream to be delivered to your audience: you’ll need one of the two Playback URLs ( HLS or DASH), depending on the protocol you choose along with a compatible web player. The Playback URLs look like this:
- HLS:
https://tutorial.uksouth.streaming.mediakind.com/.../manifest(format=m3u8-cmaf) - DASH:
https://tutorial.uksouth.streaming.mediakind.com/.../manifest(format=mpd-time-cmaf)
.
Example URL breakdown
`https://tutorial.uksouth.streaming.mediakind.com/<locator-id>/<live-event-name>.ism/manifest(format=mpd-time-cmaf- Base URL → from the Streaming Endpoint
- Locator ID → created when you added the locator
- Manifest → either HLS (
m3u8-cmaf) or DASH (mpd-time-cmaf)
Remember, MediaKind provides you with an advanced web player (supporting both HLS and DASH) at no additional cost as part of your MK.IO account. You can find more information how to use it here: MKPlayer
Heads-up: when streaming locator URL is live and being consumed by audience, egress transfer costs apply.
Try it with:
But you can use other players. Here three free web player to try your Playback URL:
- Dash.js The official DASH organization player. On the demo page you can experiment with all the configurations and options available when working with a stream using the DASH protocol
- Akamai Player A demo player of Akamai where to try HLS and DASH and low latency
- HLS.js Demo An HLS web player demo where you can tweak many playback settings and inspect detailed information about how the stream behaves in real time.
Step 8: Access the recording
You might be wondering about recording. The live stream is automatically recorded in your storage and once the event is stopped, go to Outputs in the Live Event. You’ll see an Asset created this is your on-demand (VOD) version of the Live Event:
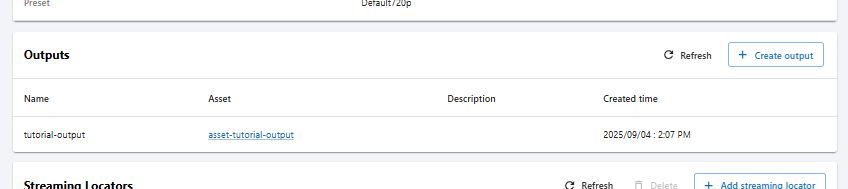
Outputs option in the Live Event page
Click in the Asset link to go to the VOD asset page that contains the recording. Want to know more about VOD Assets? Check out the Getting Started with Video On-Demand (VOD) in MK.IO: https://docs.mk.io/docs/getting-started-with-video-on-demand-vod-in-mkio#/
Shut things down
When the event is done:
- Click Stop on the Live Event page
- If the Streaming Endpoint is no longer needed, stop it too
this will prevent you from incurring unnecessary costs.
What’s next?
Now that we’ve created our first live event, I encourage you to try:
- Try enabling automatic transcription: when you create a Live Event, select a Live Encoding event and
Predefined_ACSLiveTranscriptionin the AI pipeline - Try sending SRT input: choose it on the Input Settings when you create a Live Event selecting a
Live Encodingtype https://docs.mk.io/docs/srt-ingest#/ - Explore more AI-powered features: you can already translate content using automatic transcription by specifying language codes for the main audio you want to translate — and soon you’ll be able to add dubbing or even run advanced video analysis. https://docs.mk.io/docs/ai-workflows#/
MK.IO is flexible. Whether you’re streaming once or running 24/7 channels, it’s here to help you deliver.
Updated 24 days ago